AZ Edit Programming Part 2
Special Functions are 2 letter abbreviated commands for talk and listen keys;
AC - ALL CALL
All Call activates all the talk keys to the left of it. Normally this is used to turn on multiple IFB's at the same time with just one keypress.
Alternatively, an IFB Special Lists can be used to create various groups of All Calls if the IFB keys can't be grouped together or if different combinations are needed.
The following functions pair the listen key to its corresponding talk, easier than having to type the whole Alpha out a second time, which also means, if you change a talk assignment the listen side is always correct.
AF - Auto Follow
Listen key is paired to the Talk Key and can be manually turned on or off. Many intercoms have AF on all the listen keys as a default.
AL - Auto Listen.
Listen key automatically turns on when the talk key is pressed and turns off when it's released. This can sometimes be useful with PL's but in reality, it's rarely used since you have to have the listen key on to hear callers anyway.
AM - Auto Mute.
If the Listen Key is already on, AM will automatically turn listen off when the talk is pressed and back on when the talk is released. This can be useful if feedback or echo are happening on a PL.
AR - Auto Reciprocal.
Listen Key is permanently turned on, there's no way to turn it off on the KP.
AT - Auto Table.
This is for use with IFB's and automatically routes the listen key to the "listen source port" as defined in the setup page for that particular IFB. Generally, this port is configured to be the Microphone associated with that IFB so that 2-way conversation is possible. The advantage is that a listening source can quickly be replaced on all key panels by making just one change in the IFB setup page.
NOTES
- It's not absolutely necessary to have a listen key function above the talk key of other KP ports, the intercom controller will turn the crosspoints on & off automatically even if there's isn't a listen key assignment programmed.
- The AF just allows the ability to eavesdrop on other panels - even if they aren't talking to you. (This can be turned off by checking Keypanel Privacy in the Edit Advanced tab on the KP screen, however, privacy does not work across trunked intercoms)
- A listen key must be present for PL's since there's no data signal from belt packs, CCU's etc to tell the intercom to turn on the listen automatically.
- An AF above an IFB provides a copy of the audio going out of that port including any interrupt - (the same as talent hears.)
- AT functions just like an AF on normal ports that aren't IFB's so it's the best default listen to use everywhere. A port can be set with all AT's for the listens, then change to Panel Type - so that the view is all 32 Talk Keys.

A color view is possible for viewing key assignments, (intended for use with the newer CLD panels but still sometimes helpful to see in AZ edit).
The colors are editable under SYSTEM, PREFERENCES, MISCELLANEOUS, KP COLORS. Here IFB's are red, Ports green, PL's blue and Special Functions yellow.
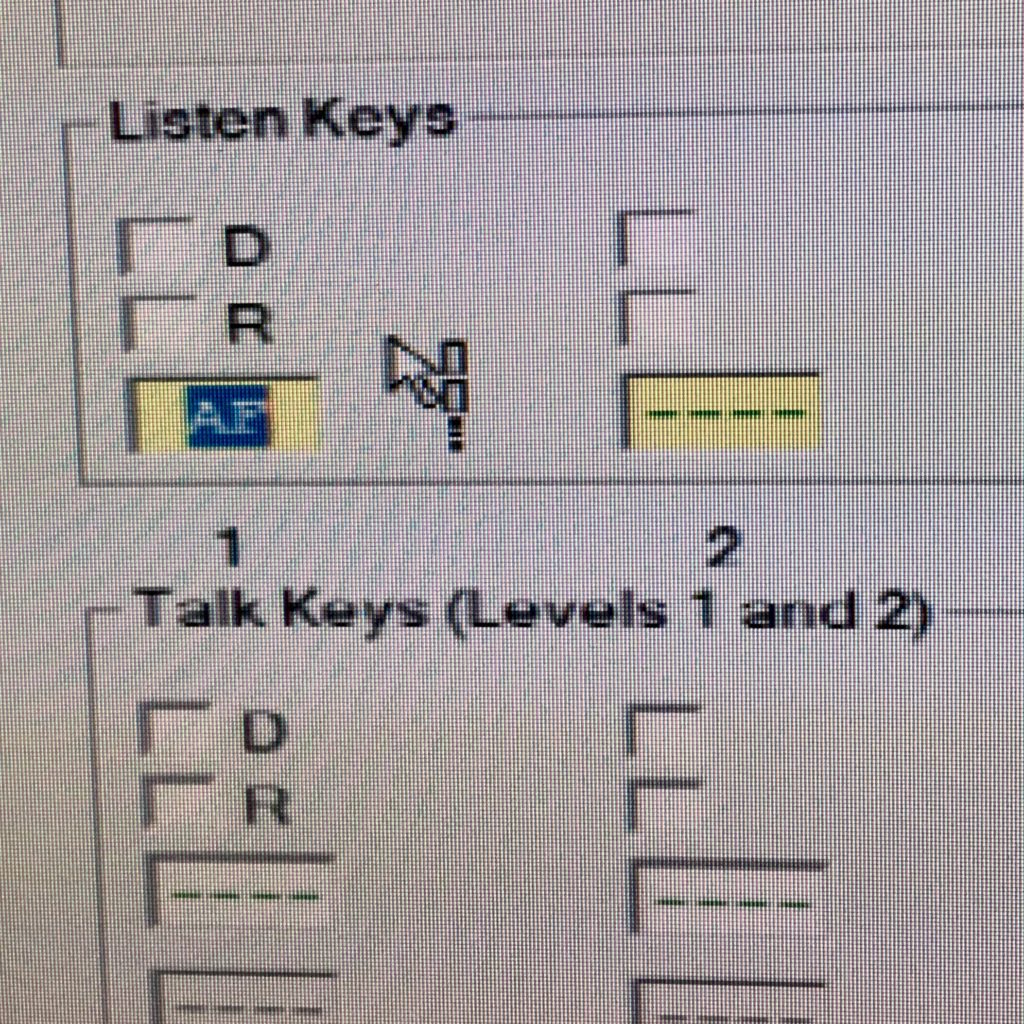
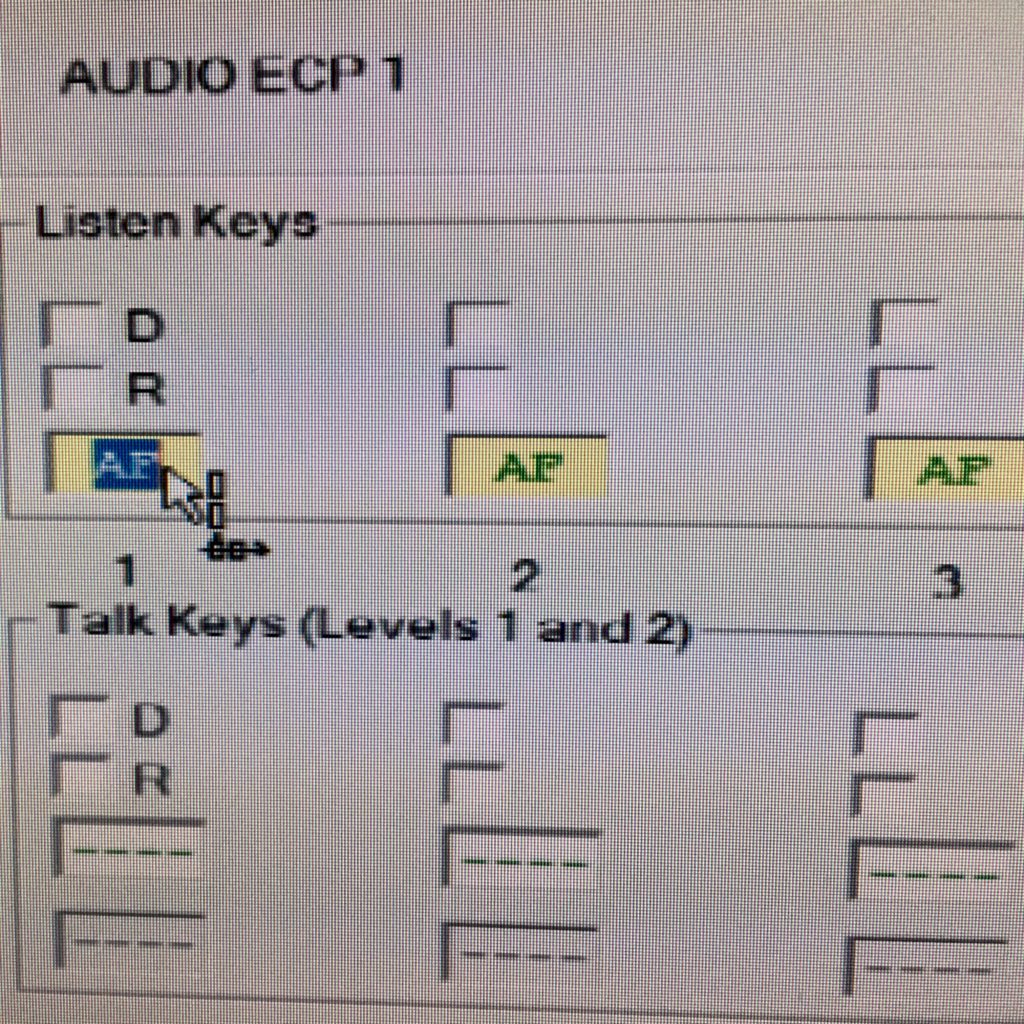
Copy and Paste AF across a full row of listens in one go. (also works for AT AL etc...)
- Type AF (or AT etc) in any listen box.
- Click on any other listen or talk key so the AF just entered has a yellow background (change pending)
- Hover the pointer over the AF and Double LEFT Click - you should see a symbol similar to an exclamation point!
- Move the pointer over the first listen key on the left (1 or 17)
- Hold CTRL and SHIFT together & nudge the pointer slightly (there should be an Exclamation point with a right-pointing arrow) then left-click. AF will paste across the whole row in one go
- You Can also paste right to left by holding CTRL-ALT.
TIFS are used to interface standard telephone lines to 4 wire for use with Intercoms. They can be dialed manually with a handset or remotely using the numeric keypad on a key panel. The following steps are needed to enable control from a KP.
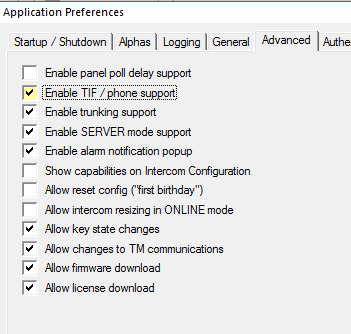
- PREFERENCES - ADVANCED - ENABLE TIF PHONE SUPPORT has to be checked on. (This must be done first).
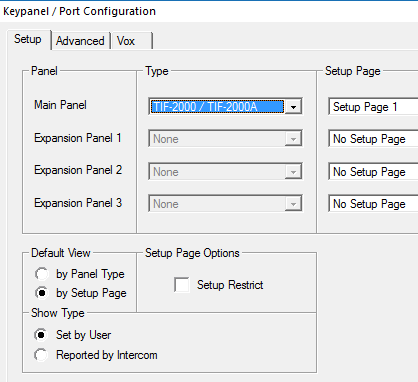
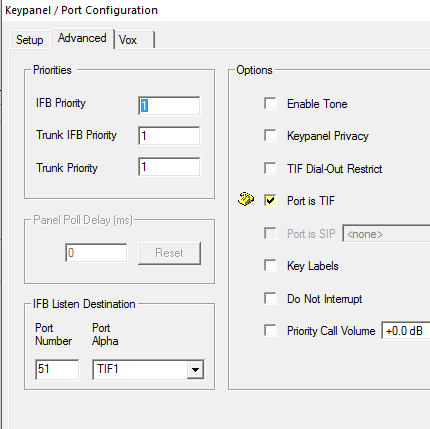
- On the KPs screen, go to the TIF Ports then click EDIT - SETUP - Choose the appropriate TYPE, (usually TIF 2000).
- On the Advanced Tab - "Port is Tif" must be checked on.
- Add the TIF port (TIF1) to a key panel - make sure latch disable is not checked on, otherwise, it will not work.
It will now be possible to dial TIFs from the keypad of a KP panel. See here.
For # and * when joining conf calls etc, the PGM key is # and CLR = *. They have to be tapped twice to activate the DTMF tones.
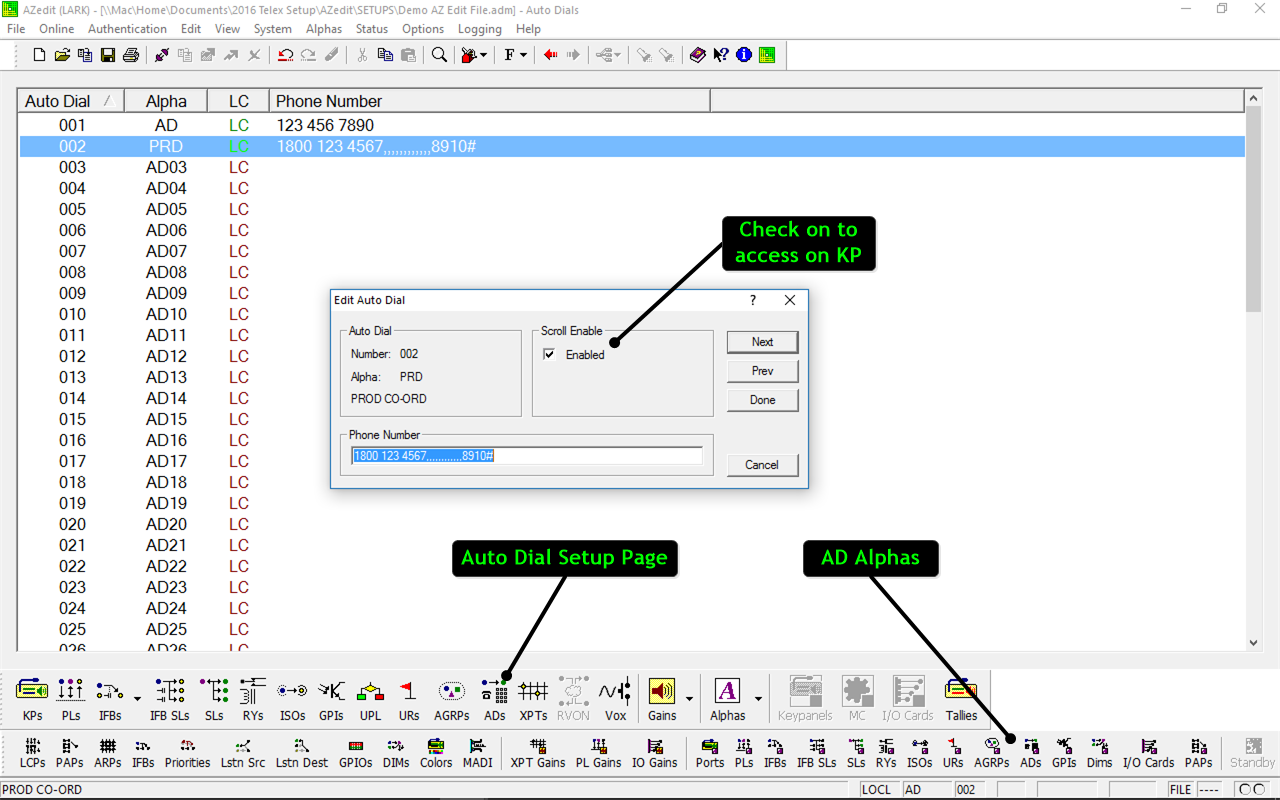
Auto dials can be programmed into AZedit which is very convenient for dialing the same co-ord numbers on a show. As always, start by changing the Alpha then go to ADs to add/edit phone numbers. For conference bridges with PIN numbers, use commas to provide spacing if needed. Make sure scroll enable is turned on so they show up on the Key Panel. To Activate an Auto Dial, press 4 then tap the Tif Key, scroll until Auto Dial appears in the CWW window, press PGM to scroll up and down through all the available ADs then PGM again to activate it one.
It's possible that the AD's may be grayed out. This is because the base Intercom Configuration hasn't been set up with any Auto Dial allocation.
NOTE: KP must have firmware version 2.1.1 or higher for centralized auto dialing.
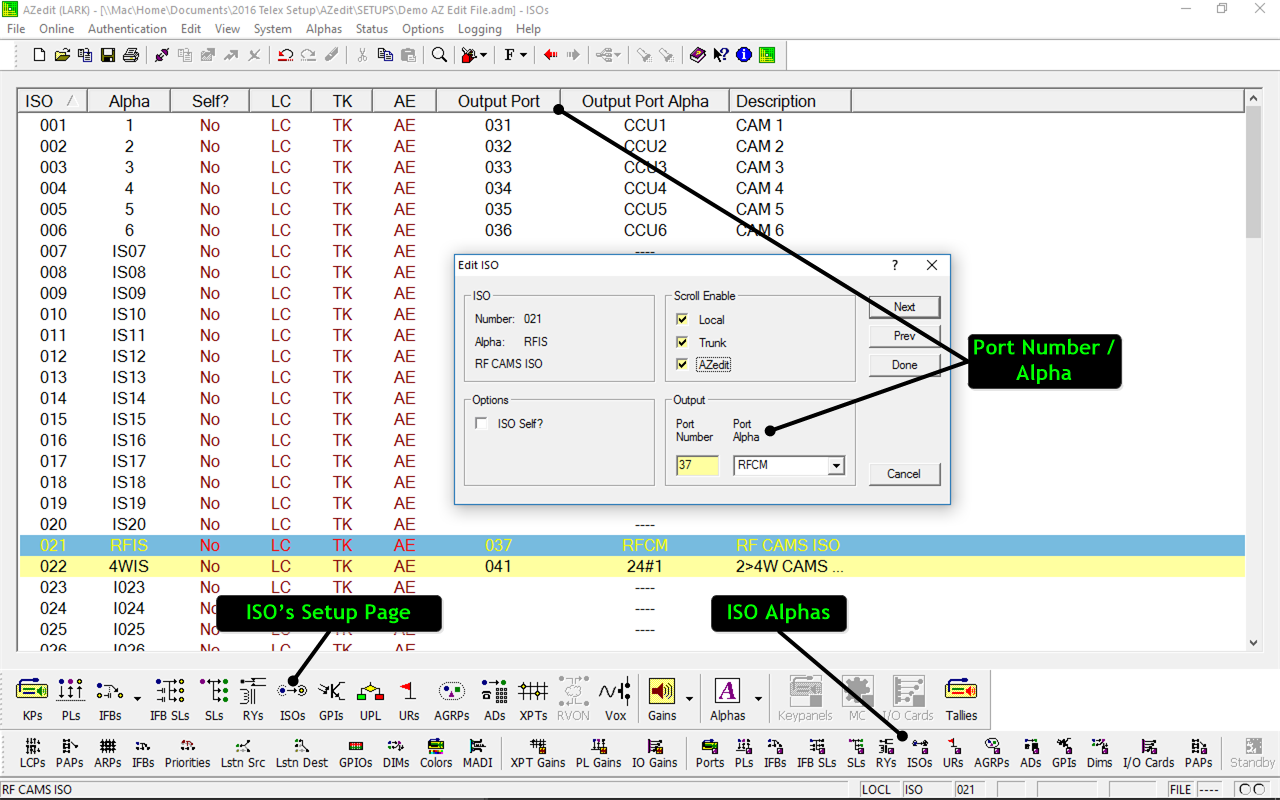
ISO's allow a port to be temporarily removed (Isolated) from a party line, allowing discrete point to point communications between a KP and a specific port. The most common use of ISO's is for video engineers to work with camera ops without tying up the main camera. The default port names for ISO's are, IO01, IO02, etc. If you decide to stay with these Alphas - then go to the ISO's set up page and match the ISO to the correct port number, then add the iso-alphas to a KP.
Usually - the CCU numbers don't match the show numbers all the way through. There are 2 ways to handle this, either changing the ISO alpha to match the show number or marrying the right ISO to the right port. Either will work. Typically truck default files are set up with the ISO's already built - so it may be easier to just update the Alphas according to the show number. If CCU 8 is Show 10 just change the ISO Alpha from IS08 to IS10.
Duplicate Alphas can start happening here, so it might be worthwhile going through all the ISO Alphas and renaming them - just to the camera show number 1, 2, 3 etc.
Cameras effectively end up with 2 associated ALPHAS - the PORT alpha and ISO alpha, I recommend keeping the Port Alpha as the CCU number, - since that's what the wires are physically connected too. It's worth adding the Show number to the camera port description to help keep track.
When a user presses an ISO key on a KP the listen is automatically activated.
ISO's can be used on any port, not just CCU's. It's a good idea to build ISO's for all the ports on the main PL's, including any 2-4 wire converters or Radios. Using 2 KP's allows quick identification of what might be causing a noisy PL, you can quickly run through all the ISO's on one while listening to the PL on another KP until the noise stops. (Using one KP to do this doesn't work since the listen automatically turns on - so the noise just shifts from the PL to the ISO, making it impossible to identify.
The checkmark for "ISO Self" isolates the KP itself from the rest on the intercom.
Special lists (SL) are used to group key panels together under one key. In this example, both VID1 and VID2 panels are grouped in "VIDO". This can help save space on KP's, for example, if a producer needs to have one key to a group of edit rooms. Since SLs are normally used with intelligent panels, users don't have to have the listen key on all the time, which is an advantage.
Special Lists don't tally, so when a user - EIC calls the VIDO SL, both the VID1 and VID2 KP's will see EIC as the caller (not the SL VIDO) there's no way for them to know they were called via the SPEC LIST. This can be good or bad, since there are times when it might be better for the reply to go back to the full SL, not just the caller.

IFB Special Lists - create a key that activates multiple IFB's. There are 2 slightly different applications. Firstly an IFB SL can be used like to group different IFB's under one key like an ALL CALL but with more options, e.g SET1 and SET 2 for talent at 2 different anchor locations.
It can also be used to get an IFB to multiple places, for example, multiple hard-wire drops as a backup to a primary RF IFB. One disadvantage of an IFB SL is that there's no ability to Auto Table the listen source.
If you need one IFB to go to just 2 places - it's generally better to use a second level (stacked) talk key, to preserve the AT capability. Beyond 2 places use the IFB SL for all the backup drops and stack that under the primary IFB - again this maintains the AT feature.

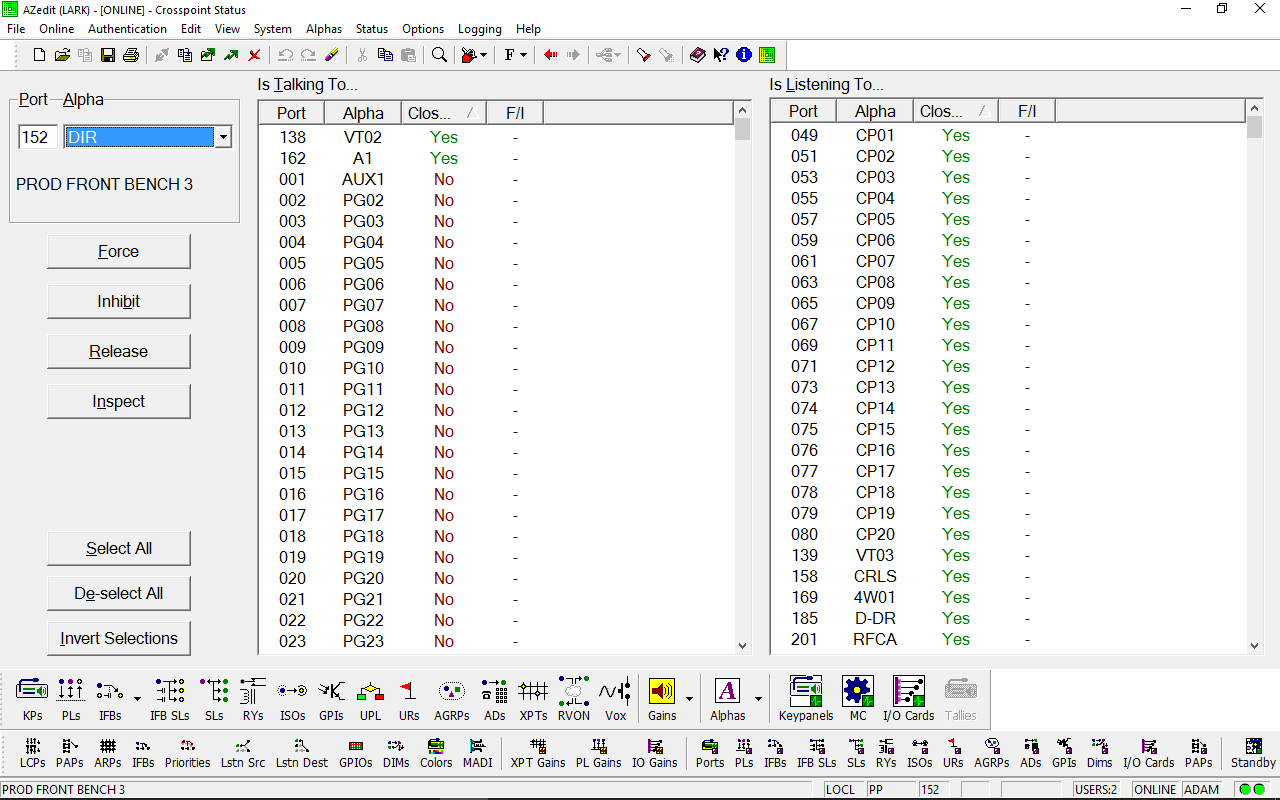
Crosspoints - (XPTS) provides live status of open and closed crosspoints between individual ports. The view shows who that specific port "Is talking to" and " Is listening to" As always, sorting can be done by clicking at the top of the individual column labels - in this case - Port, Alpha, Closed or F/I Forced / Inhibited.
This is useful for quickly tracking down any closed talk keys that may be on by accident. Start by navigating to the port that is hearing something they shouldn't, in this case, 152 - Director. (top left box).
To see who's talking to the director - look down the "is listening to column" for YES ports. This will include Ports that are built into PL's, all the Cameras for example. Besides everything in PL's look for anything else that might be on by error, here, ports 139 VT03 and 159 CRLS are ON.
Providing Allow Key State Changes is on (Preferences Advanced) it's possible to remotely turn keys off and on remotely) Go to the VTO3 port, look for the DIR key ( easy to find, the red T dot will be on, hover over the talk box and right-click) If "turn key off" is greyed out - then it's not enabled in prefs.
Right-clicking will provide more status on how those crosspoints are being closed, which is useful if it's a trunked port.
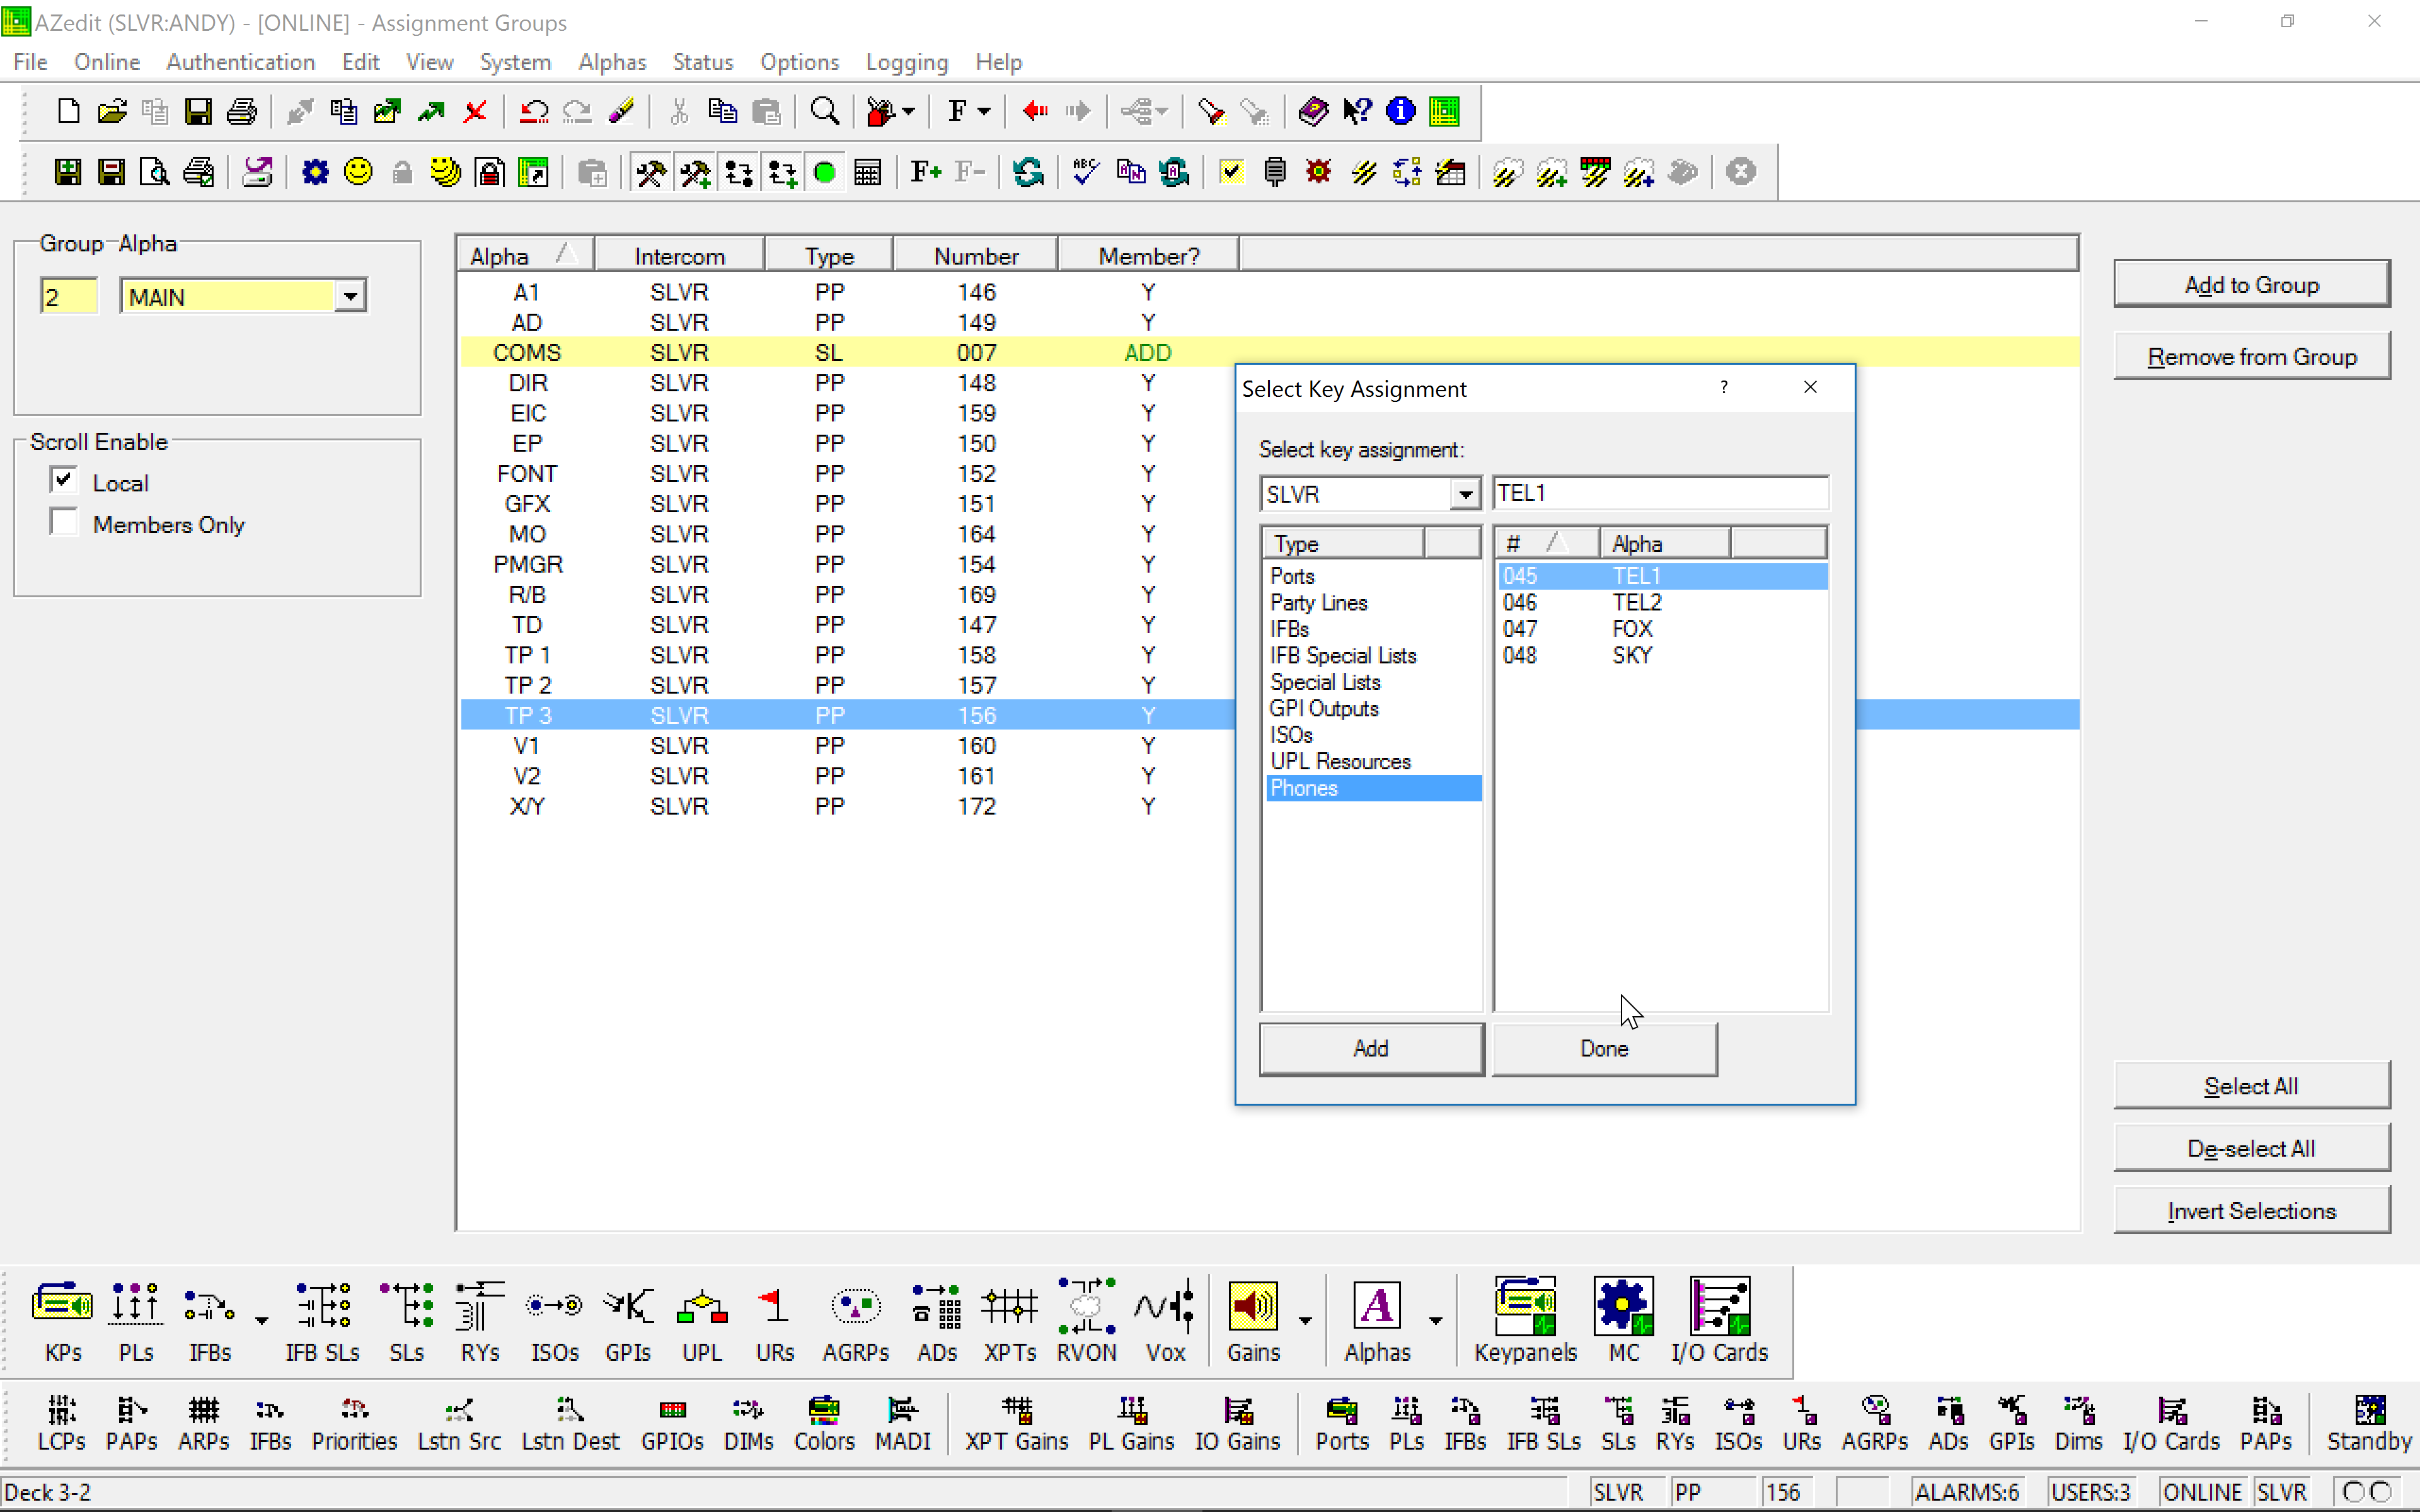
Assignment Groups AGRPs - provides a way of building custom scroll lists which are then accessible on KP's. This can be helpful on big intercoms, where it might be useful to build a scroll lists for all the main production KP's for example.
Any Combination of Ports, PL's IFB's etc can be added to an AGRP, (including from trunked intercoms) Like the full scroll list they must be Local Scroll Enabled to be made available. The AGRP must also be scroll enabled.
To access an AGRP on a KP-32 press the PGM key and use the up / down arrows as normal.
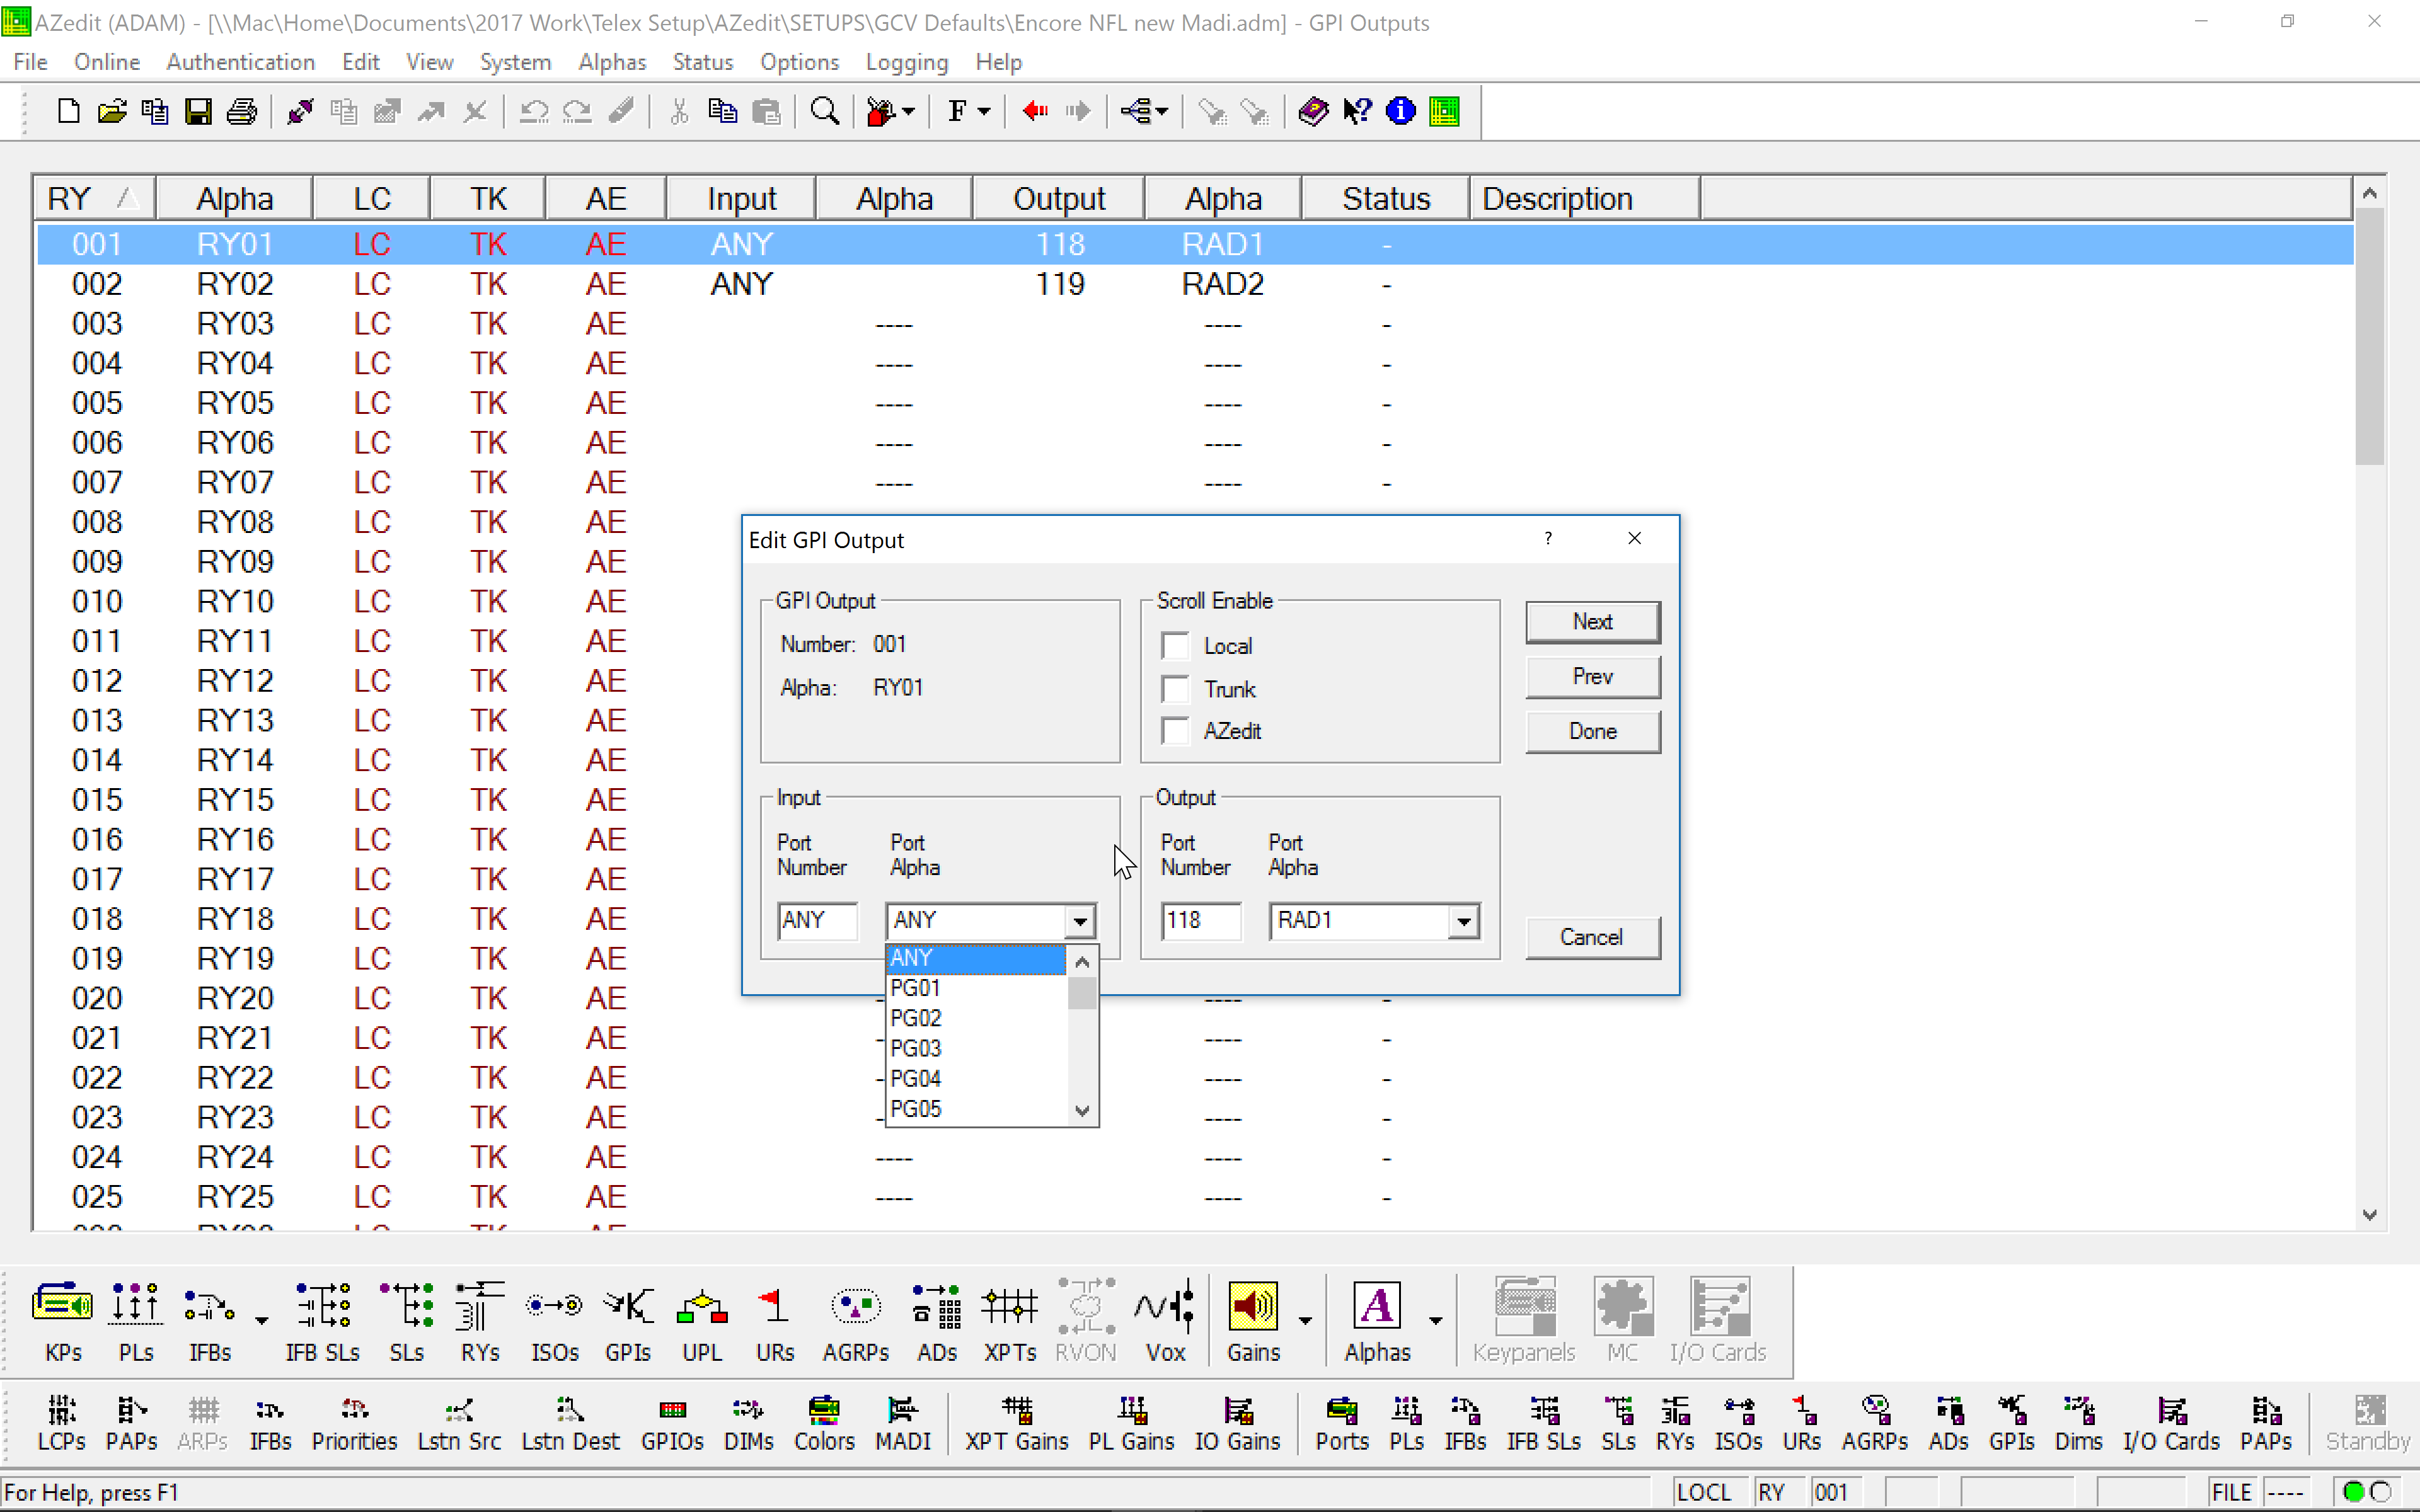
Relays - RYs (GPI outputs) Typically used to key 2-way (UHF) radios on, so they can be interfaced with the Intercom. The relay closures are normally via an RTS UIO 256 interface. Under RY's, the input side is changed to "ANY" and the output is the port the radio is connected to, that way anyone talking to the radio port automatically closes the Relay. Alternatively, just stack RY01 as a second-level key under any RAD1 talk key.
